DOLLAR STORE SURVIVAL KIT
I say it all the time, in Survival…there are NO EXCUSES…just ACTIONS!!! The Survival Kit is essential to YOUR Survival, and YOU must have one. It is the very thing that keeps you in the fight! It can be as complex or as simple as you like! I’ve seen all kinds and heard every thought and opinion on this subject in all the years I have been doing this!
I also hear, “I can’t afford that!” and I get it…But if your life or loved one’s life is on the line in a Survival Situation…YOU can’t afford NOT to! I get it, the economy can be tough, and a lot of good gear out there costs some coin! I will also say there’s more than one way to skin a cat, and sometimes you need to think outside the box!
I always encourage folks on a fixed budget to make a survival kit list and prioritize the items so that things you feel are most important to you are at the top and work your way down. When you do this, you may not have an issue, say, spending top dollar on your Top 3 Items, say a Knife, Fire Starter, and Water Procurement System, then go cheaper, and upgrade as you go.
I then thought, “Well, what about the folks who truly are on a fixed income and living paycheck to paycheck? What do they do?” Then I put myself in their shoes and decided to figure out a way and offer you a solution! In this blog, I give you…The Dollar Store Survival Kit.
I set out to hit up my local dollar stores and see what I could find. I wanted first to see if one could fill a kit with the essentials needed to survive with a budget of between $25 to $30 as my goal. I had my Core 4 of survival areas to look at Shelter, Water, Fire, and Food. Then the secondary 4; Medical, Navigation, Signal, and Communication. I thought at first it would be a breeze, but I saw that I was budget shopping, and I would have to put some thought into every item I selected.
I also had many debates with myself when it came to choosing one item over another, price vs. practicality, and in some cases, not finding exactly what I needed to cover one of the categories. So, as I raced around the store, I decided to knock out the most critical survival items first, the secondary next, and then extras if any budget was left! I placed all the items that truly cost a buck on the right side of the basket, the ones that cost $2 or under on the left side of the shopping cart, and anything above that in the top child seat area; this way, I could help keep track of my budget as well as decide what items made sense.
When you are looking for items, thinking outside the box is KEY!!! I found a shower curtain roughly 6’ X 6’, which was a fairly durable material to use as a shelter roof or poncho; if need be, it’s not a tarp but does the job like one. So, my point is, get used to finding items that the average eye may not see! One tipI will give you that I learned while in there is that as soon as you enter the store, ask where the clearance areas are, as every store has them and some more than one. Hit these areas first, as you will find incredible deals that save you big time and help you not blow your budget.
For example, My water plan, high on my needs list, going in was to get a large plastic water bottle full and find a metal vegetable can as a small cooking cup for two dollars, but there was a 32-ounce stainless water bottle that was 50% off for $3!!! To me, that was almost a no-brainer as I would have a water container where I could both boil water to purify it and carry it in, too, for one extra buck.
I was pretty amazed as I whipped around down one aisle and over to the next how quickly one could build a survival kit on a budget with decent items. The next thing I knew, I had all the critical items I needed covering almost every category. I also learned that many of the items in the so-called “Dollar” stores aren’t a dollar, and they even have a lot of things way above that but are still a reasonable price. Communication was a category that took a hit because the battery-operated radios I found were ten bucks. So not today; I guess I’ll get my news by word of mouth, LOL!
I made my final assessment of what I had in my basket, put a few things back, and was ready to go to the self-checkout! When the last item was in the bag, I looked at the total, and it was $30.01! Dang, I blew my budget by a penny, hahaha, but not bad because I had everything I needed for a budget survival kit.
My next thought was, what if I checked out all the dollar stores and made a combined effort to get the most for my money and maybe even more items for my budget survival kit? So off I went and hit them all, but before I did this, I made an Excel spreadsheet matrix (included here for you), listing all the survival items I need and finding out how much they cost by store. I then went to every dollar store I could find and repeated what I did at the first store, but just wrote down the item and cost per.
After I did this, I now had three stores’ worth of data, and yes, this takes time, but in the end, all you do is take your list and highlight the cheapest items with a highlighter. Then you go back to the particular store and down that column, and ONLY BUY the highlighted items. I made an excel file to help make a list easier; you can download the excel template HERE.
I found that your $25 to $30 budget will get you way more items and bang for your “DOLLAR”! So, I found you can save time and just hit one dollar store and get it done, but if you just take a little time and effort and hit several dollar stores with the method I gave you here, You can build a quality budget survival kit that won’t break your budget!
I also, out of curiosity, went into Walmart the next day to see the possibilities of doing a budget kit there. You could build a good budget survival kit for about $50 Bucks or less. For example, they had a small folding pocketknife for $2.97 and a lot of items that were $5 or less to your kit. I also found that you can build a budget bugout bag (Video coming soon on it at My YouTube Page “Eventure EJ Skullcrushing Life”).
At Walmart, you go straight to their camping gear aisle first, and for roughly $100, you can build a very good budget bugout bag. I found that they carry good gear at very affordable prices, better than you might think. I found absolutely everything you need to have a proper bug out bag in ALL survival categories that will serve you well. So, if you can save up until you have a Ben Franklin in your pocket, you could build yourself a decent bugout bag there!
A survival kit is worth its weight in gold in a survival or emergency and gives you a fighting chance to make it through it. You can go out there, and with a few bucks, thinking outside the box, and a little time and effort, you can build a survival kit on a low budget that will work and be there for you when you need it!
You can start with this and then upgrade from here as you can afford it! You will find that if you cut out one latte or iced coffee a week, you will have enough money to build one of the “Dollar Store Budget Survival Kits”! When people say that they can’t afford one, well, that’s either just laziness or an excuse….and I just took one of those away from you! So, what’s your reason now???
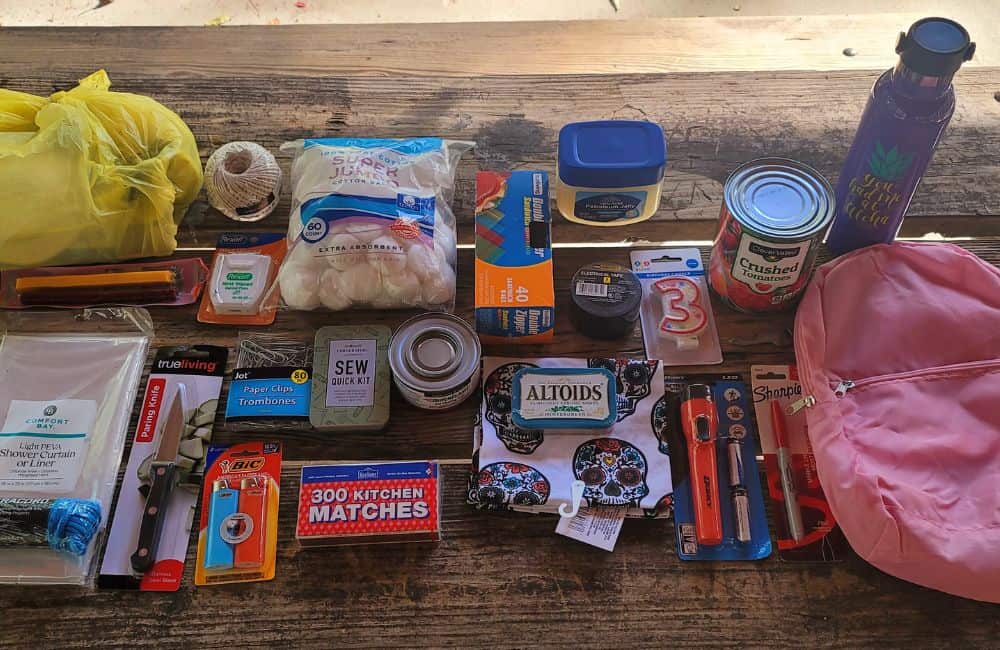
FULL DOLLAR STORE GEAR LIST:
- Paring Knife
- Shower Curtain
- 50 Ft Paracord
- 300 Ft Twine Ball
- Beef Jerky/Cheese Sticks (Bait)
- Waxed Dental Floss
- 2 Lighters
- Box of 300 Matches
- Sterno Can
- Bag of Cotton Balls
- Jar of Petroleum Jelly
- Altoids Tin
- Cotton Bandanna
- Sewing Kit Tin
- Bag of Paper Clips
- Colored Ziploc Sandwich Bags
- 2 Rolls Electrical Tape
- Candle
- Flashlight with Batteries
- Scripto Red Marker
- 28 Oz Metal Tomato Can (Cooking Cup)
- Small Metal Tool with Can Opener, Screwdriver, and Cutter
- 32 Oz Stainless Steel Water Bottle with Lid
- Small Pink Backpack
NOW GO Collect YOUR Ash Tray change, GET YOUR KIT, and Survive On!!! ~ EJ Snyder


